i wanted to put something interesting on the kids table. when i found this tutorial i thought it would be a great addition to the table. it ended up looking like trash in water in a bottle. i dumped it
Monday, June 18, 2012
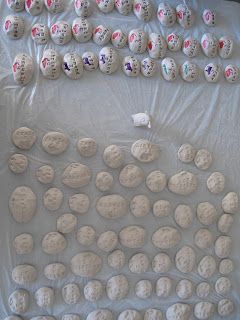
escort rocks
When i saw this tutorial i knew i wanted to make my escort cards into these rocks/pebbles. we had to wait until most of our rsvps were in before i got started on this. i shaped the rocks with my hands then used letter stamps to create the names. i went with first name and last initial. i also stamped their menu choice onto the rock. it took a couple days to dry. i then applied gel medium/varnish. the tutorial tells you to use a sponge brush for varnish but that created a lot of bubbles. so i used a brush. some of the bristles came off so you have to be careful. i also did this thing where i squirted gel medium onto the rock and then went around and spread it with the brush. this remoistened the clay and created weird indentations. then it tells you to use a pen. the pen really doesnt work as decribed. and also if you dont wait until the varnish is completely try it could clog your pen. i found making the letters black pretty difficult. and also coloring in the menu choices. it then tells you to put another coat of varnish on, but when i did this, the ink from the pens ran. so i ended up skipping that step altogether.

Friday, June 8, 2012
rope baskets
argh this project was just a pain in the butt. i saw on some tutorial that said that she just sewed a basket with a zigzag stitch. i tried to put it under the sewing machine and it choked. the rope i got was way too thick. so i just took a glue gun to it. i hate glue guns. they burn me.
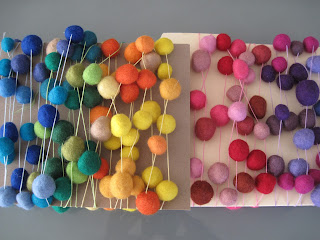
felt ball garland
finally!!! i think ive been making felt balls for a year now. i had repurposed some of them for the wreath but this was what i had wanted to do with them. i basically made a whole bunch of felt balls. i would needle felt them by hand and once i got them to a nice round shape i would tie them into pantyhose and then throw them in the wash. when they came out, they were not round. so i would throw them into a laundry bag and put them in the washing and drying machine for a few cycles. they came out rounder. lastly, i strung them together using embroidery thread and needle.
rehearsal dinner gifts
for rehearsal dinner i decided to give everyone a candle. well actually i had somehow amassed a large collection of candles from gilt, myhabit, and ruelala. most are voluspa, some soi, some DL&Co, some burn. i made the sign with cricut and then for the candles themselves i just wrapped them with natural colored wrapping paper then wound divine twine several times around. the tag were also cut from cricut and i stamped names on them as well.
Wednesday, June 6, 2012
moroccan lanterns
this picture is also not too clear but i bought 13 moroccan metal lanterns online. they were cheap. $4 for 8 of them then 7 for the more fancy ones. i added some ribbon to the tops of the smaller ones. then the larger ones will be hung with ribbon as well from trees ...
ribbon streamers
so here in the floor we have ribbon streamers. i had put the ribbon on rope so it can be easily attached to the front row of chairs at the ceremony. i used A LOT of ribbon. i had bought two spools from michaels and those only gave me two streamers each. i had gotten some ribbon from my moms friend in hong kong. i dont think they were too expensive. but i used ALL of it. not sure how much coverage this actually gives but hopefully its not too sparse.
fringe streamers
so up until this point i had not fully assembled the fringe streamers. i was putting it off because it seemed tedious. it seemed impossible. it seemed like it might get ruined. i tried to unfold the streamers one fold then glue that part to a rope using glue. some of the streamers i could tell would be pretty difficult to unfold just because the folds were so tight. i remember in the tutorial it said to "Step 4: Muss up the fringe on each side, separate the layers and scrunch it with your fingers" hopefully that isnt going to be too diffcult for the people setting up. the glue didnt hold too well so i had to actually reinforce it with some packing tape. not too attractive but hopefully we can flip that part down so you cant see it? some were also ripping because the cuts were too deep .... sigh
Friday, June 1, 2012
cranes
so im happy to say im finally done with this project. actually it was my sister's idea but i ended up executing it. she did fold a lot of cranes. but man did i have to fold a lot of cranes. i dont even know how many there are since i just ended up folding all the papers i had. i took a needle and embroidery thread and strung them together in colors. then tied the strands to another rope.
these were originally supposed to adorn the "just married" sign i made but the fiance didnt like that so i removed them. now im not sure where this will go ...
these were originally supposed to adorn the "just married" sign i made but the fiance didnt like that so i removed them. now im not sure where this will go ...
cake stands
so i volunteered the fiance for this project since he is better with the exacto blade. i came back from the long weekend and they were done! im really happy with them. he is thinking we need to add ribbon or something to the edges but i would be happy even if we didnt. we bought the cake sheets from michaels (which arent cheap by the way) and he sprayed glue and wrapped them with silver wrapping paper. for the tiers he measured cupcakes, yes he actually went to buy some cupcakes from safeway, and made about 4 feet for each tier. the feet were basically wrapped cardboard.
RSVP cards
under the persuasion of the fiances mom, we decided to print some RSVP cards last minute. im a bit glad we did because some of them have come back with messages and funny notes. i had weighed printing them via letterpress or regular press but couldnt justify the cost so we just went with the cheapest of the cheap. PSPrint which gave us 100postcards for about $25. i might go with them for the thank you cards too. again i had wanted to go with either minted (since that is where the original design came from), zazzle, letterpress via mercurio brothers, or psprint. but psprint is just so much cheaper, its hard to justify anything else.
leafy lights
So most of our printed materials have a leaf design on them. I kind of wanted to incorporate them into our decorations somehow. i had extra string lights so i cut leaves out of tissue paper and use floral tape to wrap them over the bulbs. im actually not sure where we will put these. but im sure they will be of use somewhere? this was actually more tedious than i had anticipated. i started wrapping down the string light and did about every other light and after an hour i had only done a couple feet. some bulbs have one leaf and some have two. of the ones that have two, some have one color of leaves and some have two.
Subscribe to:
Posts (Atom)


